
Complimentary Homework(out)
Ok now you know what and why…here is a good start on how.

Here you have a great straightforward workout where we have focused not just on how to execute the exercises but how to better fit them to you in a personal way. This is primary to how we address exercise where effective performance is what gets the moves working with you – not just you trying to go through the moves.By necessity the full post is long as it discusses tuning techniques for each exercise. If you read the individual Facebook posts previously you will see the first one here covering your midsection is the new one. You can skip down to the end and see the routine and details on how to lay it all out. As with everything we design there is plenty of detail in the background but the framework and actual execution is unencumbered and user friendly. It is likely you will want then as you try it, to skip back and review performance notes, take them seriously and the routine will have a seriously positive effect on your body.*click on pictures for close up viewThe Core of the Core.
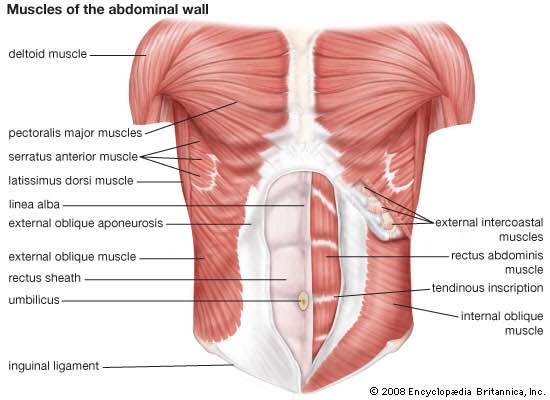
We are being slightly sarcastic with the title here as the whole fad of ‘core’ exercise has always been laden with too much marketing hype. The fascination with the look of abdominals has clouded the issue especially considering that a superficial six pack is 99% nutrition and low body fat rather than exercise. Trying to ‘bring out’ the abs through core work is as effective as trying to cardio off your body fat. Those are two huge misunderstood elements of fitness and in our experience as Fitness Clinicians when you focus too much on looks you rarely discover much about exercise science or your own physiology. Suffice to say core work is often done too much one way and not nearly enough another leading to muscular imbalances and wasting plenty of time and effort.

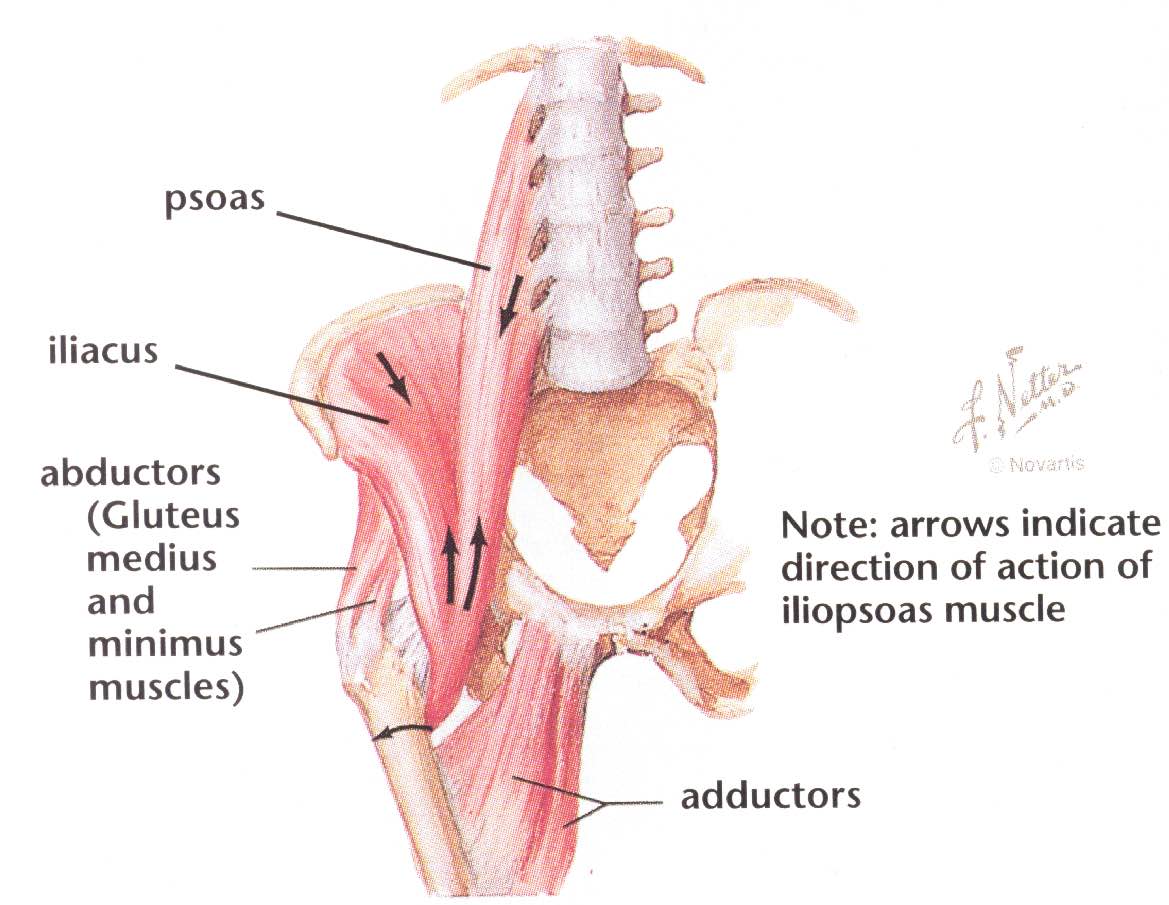
You may or may not know there is a lot more to postural muscles than meets the eye. Deep small muscles close to the skeleton fortify your core especially during force transfer and these muscles can be friend or foe. All over your body when instability is detected these muscles, which people tend to only vaguely be aware of, can clamp down almost involuntarily. The result is a temporary safety measures but possibly a long term ‘stuck on’ tension. Muscles like your psoas, iliacus, abductors, adductors and gluteus are strong, large and can totally change functional, core related ability. In fact, the more you look the more you will see that actually ALL your muscles could be considered as core muscles if you visualize your skeleton as your bodies true core.For the sake of this section we will stay with the midsection just be aware there is a lot more to it than hundreds of crunches if you want real core stability, strength and balanced function. In our clinic we use several specialized pieces of equipment to deal with core complexity but there are several straightforward tweaks and moves you can use for exercise to good effect.

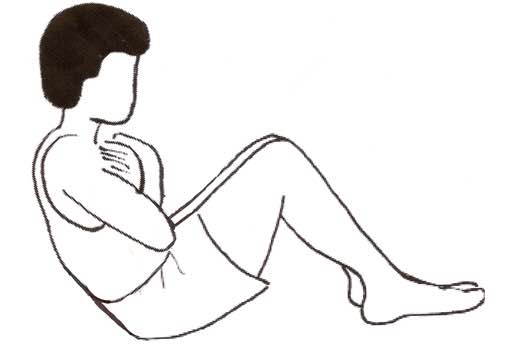
First let’s address direct abdominal work where people often have difficulty controlling and feeling their abs. We always see a big smile as clients first really find their abs and feel them contracting because they can be frustrating to target. Two techniques which really help are static stops with negative (muscle elongation) accentuation and mid range contraction focus.A) For the first we actually recommend hooking the feet under something like a couch edge. This may encourage hip flexor cheat but for the sake of the technique the stability is needed. What you need is to be holding a weight like a dumbbell turned sideways held at the ends. You want any weight you can hold up high just below the front of your neck over your upper chest. You just rest the weight on thighs to get up to the top of your sit up then lift the weight up and use it to make coming back down tougher and heavier. So started at the top you hold up the weight with your hands resting high on your clavicle and slowly reverse crunch back and down. When you reach the middle of what we call the negative (the reverse of the ‘positive’ contraction) as you lower down you stop. You are stronger holding weight than lifting it so the stop allows your nervous system to feel confident in kicking in fully to use the abs if you focus on them. Furthermore, the stop evokes a mild stretch reflex which can enhance feel and mind muscle connection. As you improve you can actually squeeze back an inch up and into the crunch before holding. Hold just for a second or two then slowly continuing your descent feeling for your abdominals as they stretch out. Then lower the weight to hips again and cheat your way back up to the top. This set is all about the downward portion, the stoping and the stretching.
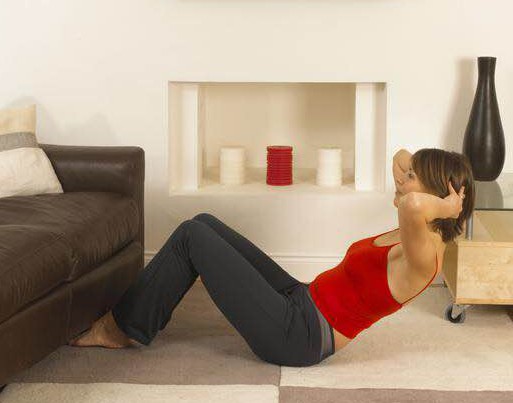

B) The second technique is much more simple but don’t underestimate it. We have had countless clients discover their abs with just a few workouts using this approach. Using the same feet hooked position cross your arms across your chest and do your best to crunch up to the midway point. If you have any…any difficulty sitting up don’t fight just cheat right to the top then lower down to the middle like in the first exercise. Similar to holding a weight we are much stronger lowering a weight than lifting it, an evolutionary trait developed for safety that most people are unaware of. Once you get to the middle you are basically just doing your best to squeeeze the abdominals and crunch back and forth through only that middle 1/3 of the sit ups range of motion. Because of the way you muscle filaments are designed and work on a microscopic level you can achieve enhanced burning feeling in the mid rang of most exercises. This will help you discover and better isolate your abdominals as there is no relaxation at top and bottom of the move. Just do as many as you can, rest and try again. After a few short sets your abs will sizzle and be easier to identify.
The other two key parts of your midsection are your obliques (the right and left sides of your abdominal area) and your lumbar/lower back muscles. There is a nice and simple method to work these groups just standing and holding weight in either hand. This is such a straightforward routine it is all but forgotten in the field of fitness. We can remember back to a kinesiology major with nagging lower back pain who was in the process of training with us and learning our particular certifications materials. When we had them perform these little actions they proclaimed them silly, stupid and a waste of time. Some six years later their back still bothered them and we saw them trying the moves again on their own…the point being don’t over look clean and simple, often the most basic stuff is a game changer. Here is how it is ordered, don’t just do it, work the actions as described, it is what is going in on the inside that counts a lot more than the outside visual movement. Standing tall and arms hanging loose at sides you bend down to one side letting the weight slide down your leg. Your focus is not on the side bending but on the muscles of the opposite side stretching – this is key!

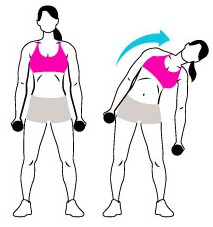
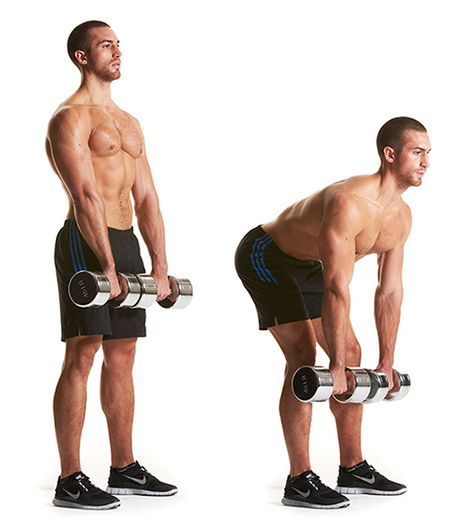

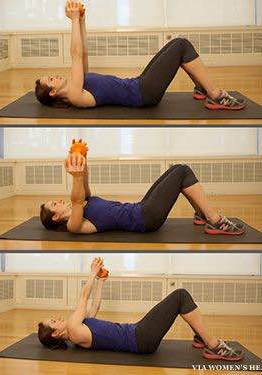
Feel for the muscles on your opposite side elongating as your ribs and spine stretch apart. Don’t try to go too far especially at first just take your time and slide into the stretch. Next feeling for those same stretched muscles and squeeze them brining yourself back up upright followed by doing the same for the opposite side. Next is the tougher part, keeping your chest high and shoulders back/square…no matter what…Let your hands come around front of you as you bend down wieghts moving towards the floor. Don’t worry about depth especially at first, instead all your focus should be on feeling your lower back squeeze and the back of your legs stretch. Your legs should be fairly straight with just a slightly soft lightly bent knee joints. Once you get to a mild sticking point you stop and reverse digging your heels into the ground…yes heels, as you squeeze back up to standing. That is it, right side bend, left side, forward repeat. Go slow and hold some real weight ‘once’ you are positive you have good feel and control. In time you can hold a lot of weight because these are strong muscles but where your lower back is concerned proceed with caution.Two more under utilized core actions are the squeeze hold with rotary twist and the vacuum, these are more advanced midsection control moves so master the first three exercises first: 1. For the twist you lay on back with legs bent feet flat on floor with something held between knees. A row of pillows, ball, cushion etc works fine as long as you can squeeze it and hold with some force without it falling. You are laying back flat and you will need a weight to hold with both hands but it won’t need to be heavy. Holding the weight up, arms outstretched over your torso NOT your face, you lower to one side then back up and down to the other. As you lower left and right you keep tension on the object between your knees especially squeezing it as you rotate out of the side stretch back up towards the start position (like counter steering). As with the side bends your focus is on the opposite side of the movement so when you lower down to left you feel for the right side of your abdominals stretching then pulling the action back towards the middle. Down to the right feel the left, down to the left feel the right and squeeze the inner thighs to push the knees together.
2. With the vacuum it is very mental and mind image based, try it standing first for full effect. With tall posture you draw your abdominals in towards your spine as far as you can imagining pulling in at the belly button from the inside towards your back. Once you are in as far as you can go…and this is the key part…you try to draw the abdominals upwards inside. At first they will not even seem to move but with practice the tension will be there and very slowly some movement will become perceptible. Draw in and back then up, slowly release and repeat. You can practice in the mirror and place finger tips on stomach to help target.

Basic core strength is important for mobility and spinal health. We recommend if you have any back pain and/or noticeable core weakness that you perform a light easy version of the movements as a warm up to your exercise session then finish with a tough hard working run of these moves as a finisher.
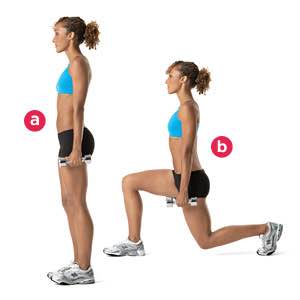
Let’s Get Real (with the Lunge)
While everyone is out there jumping and running around trying to exercise off unwanted fat at the same time as get ‘in shape’ few change beyond the short term and superficial. Exactly like so many fat blasting diets, some change can happen quick but just doesn’t stick, this is because they’re not real changes – they’re a short term survival reaction to dramatic changes in living conditions. Exercise and diet is stress, it’s a drain on your system, you may feel better short term while doing it but that is a cascade of temporary, feel good chemicals designed to help you deal short term against the sudden stress – It Does Not Mean That While You Are Doing It You Are Making Good Changes! The change comes well ‘after’ the exercise, after the clean food and the calorie restriction. The good of fitness techniques arrives during recovery ‘if’ you have chosen the right stimulus and allow for reasonable rest time. Otherwise yes you can make some short term alterations but what you can handle and maintain short term is very…very different from what your body will do long term.
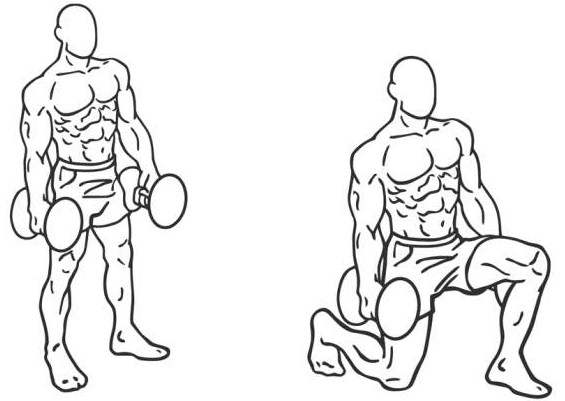
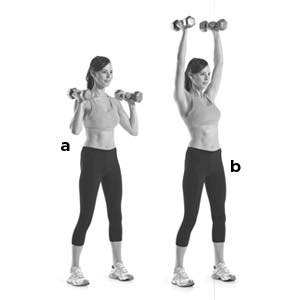
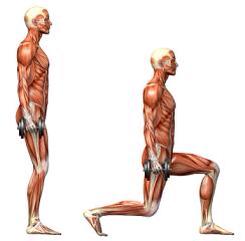
We recommend you slow down and apply real intensity and stimulus to your body rather than always trying to be hyped up bouncing around. Take the lunge for example (pictured) what a incredible exercise all around. If you move slow and pause at the bottom (no not resting with knee on floor ;n) if you move slow enough to stay almost perfectly upright, if you focus not on getting up but on squeezing your thigh, if you breath in on the way down and out from your diaphragm on the way up…these things take it from an act to and action. No weights? Not enough weight? No problem – only come up halfway twice before standing all the way up during the third push ‘then’ switch legs (so lunge down then halfway up then back down again and up to the mid point once more then finally down a third time followed by a final push right to standing). You’ll feel this big time. Anyone can lunge and squat with piles of weight if they bounce out of the bottom quick but that is hard on the joints and connective tissue and a waste of effort.
Any plyometric, fast bouncing in general becomes an unnecessary act for the purpose of exercise. Sure it feels athletic and gets the feel going quick but it is wasted effort, loading the elastic connective tissues and just using momentum for the better part of the range of motion. Momentum unloads the muscles robbing many muscle fibres, in certain ranges, of needed stimulus and sure bouncing forces you to stabilize BUT only with your strong muscles and good traits. Your body doesn’t use your weakest muscles and poorest traits to maintain balance and coordination – in moments of quick action whatever your commonly used and strongest abilities are will kick in whether you notice or not – THIS is why you lose balance and coordination because your stronger dominant parts overcome the weaker ones. Basically they kick in too strong and what you learn with practice is to back them off rather than what is actually needed which is targeting and strengthening your weak underused abilities. [please read that a second time if it doesn’t ring totally clear, it is very misunderstood in exercise science] Bottom line the more you just blast into exercise the more it is just and act and your basic fight or flight response is superficial. Look at it this way, you can just grab any rock and throw it wild at a target in defence or you can carefully sharpen a spear. Just like diet, you can rush in and eat quantities of something that has some sort of singular short term health effect or you can learn about your body and take time to combine the foods in quantities you respond to best overall. Likely this won’t be popular to say but; yes real natural foods are good and basic exercises are best BUT only if carefully and smartly applied. The so called ‘Paleo’ notion is superficially fine however if you don’t apply things with honest understanding and with a healthcare result in mind then it is all just brutish b.s. Do yourself a huge favour, save play time for activities designed for release and fun and use exercise carefully, intensely, sparingly and focused on your specific needs. Separate acts from action because REAL actions make changes that improve your act immensely and allow you to act far more the way you wish to.
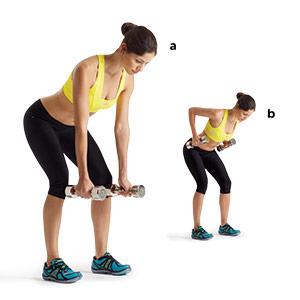
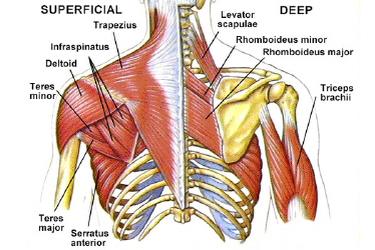
Back up your Fitness! (Rowing)
Your back is an incredible web of layered and criss-crossing muscle which you rely on constantly. Because there are so many varied muscles to your posterior side and so many angles of action it is tricky to exercise them all effectively. Basic pulling/rowing actions are fundamental to a strong back however what we see is so many people turning them into plain old lacklustre arm exercises. Here are some instrumental Fitness Clinician points to try.
First off is your hand…yes your hand and specifically your grip. Do not squeeze and crush whatever you are holding, doing so brings in your small, fine finger extensors which will fatigue much faster than your back and make a real row impossible. Furthermore, squeezing your grip locks in the arms far too much when what you actually want to do is let the weight get PAST the arms into the back muscle. Use your hands more like hooks and don’t completely wrap around and close hard at the thumb. You have more than enough strength in the big muscles on the other side of your arm (that run up your outer forearm and under your biceps) to keep a hooking action without needing to pull hard with the fingers, squeezing the grip is just a natural thing to do when holding weight…but for back exercise it is a bad habit.
Second and this is 90% of the technique – get this right through a little practice and it will completely change the way you feel your back and use the second largest muscle group of your body – You need to ‘shrug’ into a pull/row action NOT pull starting with the arms then trying to coordinate and feel for the back after you have already started moving. You know how you can shrug your shoulders up while your arms are loose, hanging and relaxed like when you motion to say “I don’t know”? Well you can use your back at all angles to shrug (pulling shoulders down, sideways etc) it just takes a bit of patience and practice. The first thing after you relax your grip a bit is to let the arms relax and try too feel the back muscles stretch some as your arms are forward and all the way outstretched in the start position. Then you use only the back muscles through pulling on the shoulder blades and trying to sense the muscles which run right down low and to the side of your back as well as in towards your spine. You do this BEFORE you ever bend your arms and it should eventually allow you to move about an inch or two even without barely tensing your arms. Next you pull through with the arms with most of the feel right in the back muscles so when you get to the top position you can really tense them up and give then a good hard squeeze before releasing and slowly stretching back out to the start position. Start with a set or two of just practicing the shrug with only one or two reps that you pull through to the top (keep the weight medium light). Take your time, the feeling is very subtle at first but when you find it, it will be obvious like it has been hiding in there somewhere all along. You shrug from a good pre-stretch then squeeze the back muscles through to the top where you imagine balling them up like a fist and giving them a hard flex before easing back out.
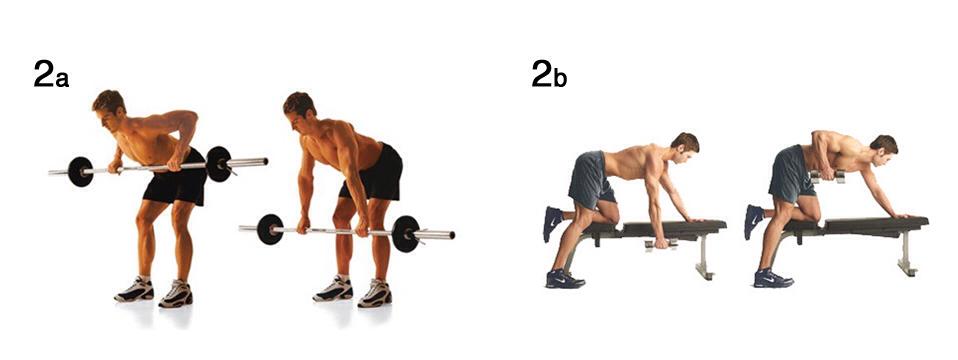
Additionally, one of the harder parts of back exercise is keeping the shoulders down and not pulling up on them with your easy to feel upper trapezius muscles beside your neck (the ones that get knotted up and sore from stress). As you row concentrate and work to keep you shoulders down as they would be when relaxed rather than pulled up towards your ears. Another tricky part is to draw the shoulder blades in the proper direction of pull. You need to squeeze them together towards the spine but again it matters what exact angle of pull you are rowing from because they can slide around with some reasonable coordination. Don’t over think it though, just imagine in your mind the proper actions of semi relaxed grip and shrugging into the action with a nice tight flex at the top and reaching out for a good back muscle stretching feel at the bottom. Always start slow looking for the proper feel – because pulling is such a natural easy motion in life we tend to jump into this exercise way too fast even when experienced with rowing.
As always what you really want from exercise is to work on your weakest muscles and poorest traits NOT things you are already ok at…right?! Again remember start slow, think about what you are going to do, the fact is once you create motion your nervous system kicks in with old ingrained motor patterns making learning and adjusting focus somewhat confusing. Ignore frustration just stop rest and start again, great things come to those who stick with it.
Squeeze Ups – Real Push ups!
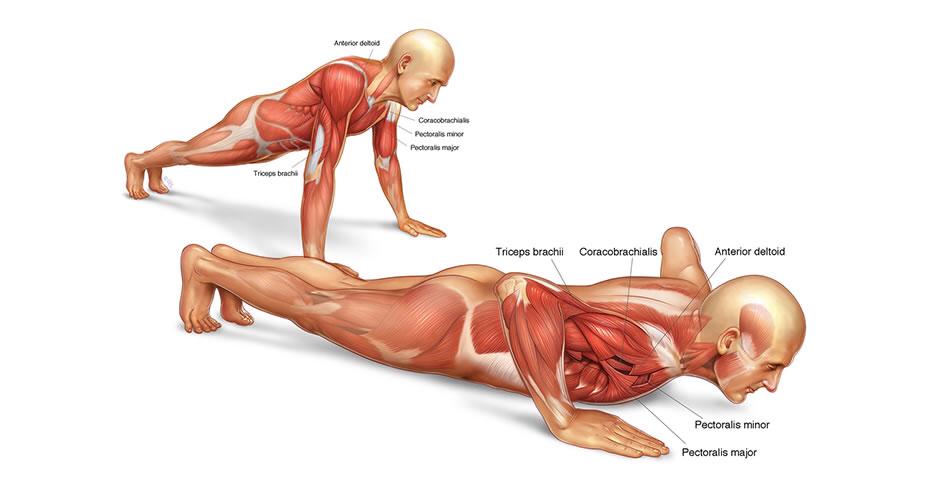
Whether you perform push ups from your knees, standard style, hands up on a bench/table (coffee tables stabilized against a couch is good) or even with feet elevated for extra resistance – squeeze DON’T push. Pushing comes from the shoulders and arms and requires almost zero purposeful focus. In other words, when you try to ‘push upwards’ you will naturally use your arms and shoulders too much. Where this exercise is so darn effective (yet so under-learned/under-utilized) is in the use of the torso musculature especially the pectorals/chest. The chest is designed for adduction of the humerus (bringing together the upper portion of your arms like mimicking a flying motion). This means a push action almost totally misses the chest which then in turn misses all the tie in connections it has with the back and core.
When you perform a push up think of it as a squeeze up where you try and squeeze your pecs/chest hard to create movement. Don’t worry about sending a message to your arms, it is so simplistic it requires almost no concentration. Focus on how your upper arms come together as you raise to the top. Think of pulling your upper arms together rather than pushing away at the shoulders. For the pushing part think of pushing away whatever your hands are touching as though you are lying on your back pushing away a weight. Keep your shoulders in line with your hips, don’t raise your butt up or let the hips sag down, stay flat.
* Tip: a lot of people especially females lack pectoral feel when doing push ups. A good way to develop it is to start by working only the mid range of the movement. The middle ROM creates extra feel and muscle burn and will help you develop the mind muscle connection you need to get the most out of this solid foundational exercise. [this is caused by enhanced interdigitation http://medical-dictionary.thefreedictionary.com/interdigita… in the halfway contracted position of a muscle] Start with doing repetitions in just the middle 1/3 of the move until your muscles burn and you can barely move. Then after a short 30 second break try full push ups. A good combo is to do the middles flat in traditional style then skip the rest break and go right into full push ups but with hands up on a bench or edge of couch to slightly reduce the resistance. Always start slow with these and feel for the chest muscles squeezing then slightly…just slightly increase speed into a rhythmic pumping sort of action, like soaking a sponge then squeezing out the water then soaking it again and ringing it out again and so forth – squeeze/release/squeeze/release…forget about your arms and shoulders just think pectorals only.


For push ups with lightened weight you can simply do them with hands up on couch or bench or with knees down, there is never any harm in going lighter especially if it enhances feel and form. Often we have very strong males do these to good effect after they have already pre exhausted their chest.
Shoulders the real ‘Core’ muscle

If you push, pull or hold anything even when you are exercising your legs, it is your shoulders which are the primary link…let’s not let them be the weak link. As Fitness Clinicians we thought we would be dealing with low back pain the most often yet weak shoulders have come up as far more common. Weak shoulders roll forward and destroy all posture. Weak shoulders cause neck pain and weak shoulders stop people from exercising the rest of their body properly.
Tweaks
Two key mistakes we commonly see with shoulder training – the first is simply using too much weight and cheating with outlying musculature. Because your arms, chest and back can easily participate in shoulder moves people tend to think their weight choices are too light. You feel your shoulders burning so they must be working hard however it can easily be your langer, near by muscles taking the greater part of the tension. The key is actually to stay on the light side the better part of the time while focusing on trying to make the actual smaller deltoid muscles contract and take the bulk of the load. We have a few excellent dumbbell routines for you to try that require light weight but it won’t be easy. Remember always make a point to avoid pulling up with your upper back muscles in a shrug, try to keep shoulders down in relaxed position rather than straining your neck. Additionally, avoid swinging and working with your torso and arms to move the weight, if you need to cheat it is too heavy – smooth, slow and steady wins this race.
Exercise 1
The first exercise is a great warm up where we combine a basic external (away from you) rotation with an overhead press. We suggest this be done standing so you can have a subtle spine. Weight of 3 lbs to 12 lbs will feel very tough after a few reps here even for larger men IF you go smooth and slow with no swing. Follow the first picture but when you get to the bottom left position you push right up into a shoulder press, then back down and reverse the external rotation. It may seem confusing but you will get it. The rotation brings you to the standard start position for the shoulder press so it is natural to go into. Just start with the dumbbells pointed out with arms bent 90 degrees both your elbows at your sides (top left) raise them to shoulder height while maintaining the 90 degree bend (top right). Rotate back and up to having dumbbells pointing to ceiling (bottom left) then press up over head and back down followed by reversing the first 3 actions of rotation. Bend, side raise, rotate back and up, overhead press, down, reverse rotate, reverse side raise and repeat.
Exercise 2
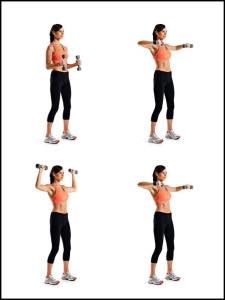
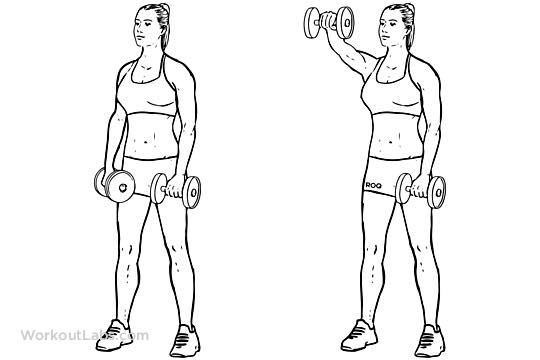
Next routine is simply to combine the three standard dumbbell raises as the different angles of action fatigue each other to greater effect. Perform and alternating front raise (one side then the other) into a rear fly raise with both hands (together) then back to upright posture for the common side raise and repeat. Front raise one side then the other, next bend forward for rear raise (but don’t strain neck and don’t swing the dumbbells back too far try to keep them more in line with shoulder joint) finally come upright posture and squeeze the dumbbells away from you to side raise.
Try to avoid lifting the weights upwards as that tends to engage your neck and upper back, instead squeeze the shoulders like making a fist and push away from you, the lifting part will happen with little thought. As well, avoid coming up with your hands and elbows higher than your actual shoulder joint. Keep going through position 1, 2, 3 and your deltoids will achieve a thorough deep fatigue.


Exercise 3 A and B
Last routine you have a choice of 2 seated overhead shoulder press approaches. The second is more challenging and you may want to leave it until your strength increases. With either choice make sure you are seated for stability.
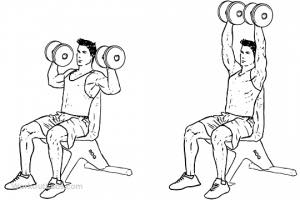
A) Hold both dumbbells with both arms stretched up overhead and alternate sides of overhead pressing. One side keeps the hold up,top,while the other does a down/up repetition. Basically this is the reverse of a standard alternating shoulder press, holding at the top rather than resting at the bottom. Strange as it may sound we want you to focus on the shoulder which is keeping the hold up overhead not the one pressing. You will be able to press and switch sides with little thought and the act of feeling for the holding shoulder keeps the tension and balance where it needs to be. Sit nice and upright with good tall posture looking straightforward, hold the dumbbells right overhead (you will have a natural slight bend in elbows). You won’t need heavy weights here because of the hold and because this is your third exercise so with lighter weight you will be safe but always remember to move slow, smooth and purposefully (the purpose of course is not to move around dumbbells but to strengthen the deltoids)

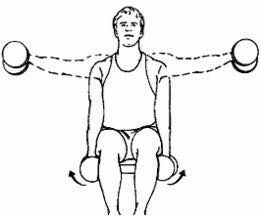
B) This one is a bit tougher to describe but it is actually very simple and smart. You are doing your overhead press for the pushing up action and a side raise for the lowering down action. So you start seated with dumbbells hanging at your sides like you are going to push away for the side raise you did earlier. Instead, you curl the weight up to shoulders for an overhead press. You set and go pushing up overhead in standard fashion then stop there for a moment holding like in the previous exercise. Now is the fun part, while you are still holding you turn your hands so your palms are pointing away from you (outwards away from your sides). Think about that for a minute, this sets you up for the side raise position as when you now lower your arms slowly you end up coming down to sides again and back into the side raise start position. This is tricky because you have to turn hands properly (palms out not palms in) and fight the weight as you lower down to the point where your arms are outstretched away from you in flying position (where the action is heaviest). Just go slow in steps, curl up to starting position for the overhead press, press then stop, turn palms out, stop, then lower slowly really squeezing those deltoids hard as you pass midway point. You need to fight it and purposefully attempt to slow down the lowering as though the weights are made of glass and need to be carefully set down.
*Go light the first time you do three exercises in a row, you can always go back and do it again a bit heavier, the point is to learn the moves and to feel the shoulders flexing and squeezing. How much you can lift and how fancy you look doing it is a distant second from how you lift and how well you properly and safely load the target musculature.
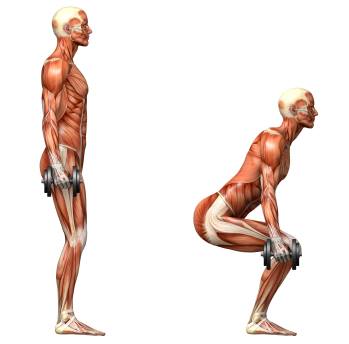
The All Wonderful Squat
Squatting is one of the most natural body movements there is yet the one exercise we continually find people reluctant or incapable of performing. We even find people having difficulty sitting back and down into a chair without collapsing. Then in reverse people lean way out and swing up to stand. Your body is designed to take advantage of the squatting muscles and children do it easily. Unlike sitting in a chair where your lower back is loaded, when you are at the full bottom position of a squat there is very little load on the spine. For eons humans have worked and rested down in the bottom of the squat position.
Often we think we are not flexible enough to squat but that is an illusion. Decades of not squatting has built a neurological inhibition into your actions and restricts your motion just like an arm gets tight and weak when in a cast/sling for months making it tough to straighten afterwards. It is literally a matter of doing it enough times to relearn the action and release the motor pattern restrictions. The key is in the hips – the common mistake is to bend at the knees as well as the lower back to create the initial downward squatting action. This pushes the knees out far over the feet and you compensate by leaning your face down towards the floor too much…both of which throws you off balance and places you in a weak position.
The key is to think only of pushing the hips backwards while keep the chest up and shoulders square (rather than allowing rounding forward of shoulders and upper back). When you simply maintain upper body squareness and push the hips back like sitting down into a chair the action takes care of itself. The knees and lower back bend only as much as is needed because to push the hips back without falling they must adjust naturally for balance. Don’t over think it just practice while holding a chair back and squatting down into another chair but without resting on it. Just touch the seat lightly using your hips, gluteus and thigh muscles to support you and drive you back up to standing. You can also practice by putting your hands up just above shoulder height on a wall you are facing. As you squat down your hands on the wall help you relearn the balance points.
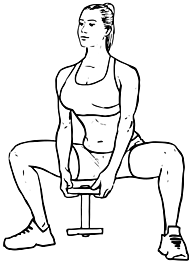
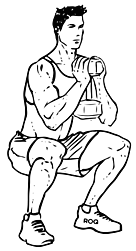
Again it is all in not fighting it, relaxing into it and letting the lower body muscles light up and burn. Don’t worry how deep you go at first, in time you will increase range of motion. As an exercise the dumbbell squat in the first picture is good as is holding just one of the dumbbells by and end bell with the other bell hanging toward the floor. This ‘sumo’ squat (second picture) makes it easier to maintain balance and go deeper as does the third example called the ‘goblet squat’ which is a bit tougher balance wise but good for reminding you how to maintain upper body squareness.
Don’t avoid or overlook this fundamental exercise, anyone who can do even a halfway reasonable motion can try 25 continuous body weight squats and know how effective they are. When holding weight almost your whole body will get worked including your cardiovascular system. As always move slow and smooth, breathe in as your lower downwards and breathe out as your drive back up to standing. Look forward not down, looking down may feel better for balance but it throws off posture and in reality makes balance tougher.
~
Workout StructureSo here you have it, pushing, pulling, shoulders, legs and core. Set them up together and you have an excellent fully body workout routine. We suggest you go through the routine with medium/light effort to practice and warm up then back through with full effort. Always move slow and purposefully, the purpose being loading the muscles properly not just going through the motions. A good starting order is:1. Light Core2. Lunge3. Row4. Push Up5. Shoulders6. Squats7. CoreBeginners should stay to basic versions of each action and if you can handle a third run safely do so. Once you can do this through three times without losing control and cheating movements then it is time to make it tougher. You can add weight as well as make the movements harder as with the push up and lunge suggestions. The key is to take each set of the second run through to failure. By failure we mean to keep doing reps until you get stuck in a rep where you would have to cheat to finish it. This is the number one element of any workout which stimulates your body to change – the intensity which is derived from pushing to the end of your safe momentary ability. This does NOT mean speed up and start cheating to get more reps, done properly you will actually see your reps slow down and stall. Focus on quality movement always, emotional momentum is good, transfer it to your actions with consistency and intensity of persistence NOT by throwing the weights around.
Move from one exercise to the next without resting other than to get yourself set up for the next move. Remember though this does NOT mean speed up the whole workout in general. Each rep is slow and controlled at all times, bouncing and rushing may feel athletic but it doesn’t help the effectiveness. Bouncing and throwing weight around is most often a placebo to trick your mood into working hard. Using momentum is useful during an actual sport or in the circus but in exercise it is best left aside. You will find it much tougher and more thorough to maintain smooth controlled movement. Keep in mind, how hard you yank at a weight does not reflect how hard your actual muscles and supportive organs will work. Connective tissue is elastic and adds plenty of snap to lifts if you swing and pull fast…it does not however get the resistance where it needs to be which is on the muscles so they can contract continuously. Instead it places much of the burden at the point where tendons and ligaments connect to the bone and smaller, weaker ends of each muscle. It is the continuous careful muscle contractions that place the real load on the organs. This is what creates a real deep draw for oxygen and nutrients. The more continuous the draw the more you challenge your strength and endurance. Then the challenge stimulates the improvements – improvements which you can then transfer to living and sporting action.

For more on exercise verses activity:https://wefit.ca/2013/04/07/exertivity-ex-err-tiv-it-ee~If you look at the structure it appears almost too simple but if you read the descriptions you start to get the idea how much variation and detail can exist for every exercise. If it all looks too basic you may have been fooled by the fads and flash where the marketing gimmick is to make it look like something entirely new has been invented. The truth is the basics work IF you know how to tune it to you and your individuality. The details make all the difference, knowing where to stop where to hold how to make a good mind muscle connection. One good rule of thumb is the exercises which feel awkward and weak are the ones to focus on. Movements you feel athletic and strong at will not be nearly as effective at stimulating change. Performance heroics are for sport and play where as exercise is to anchor your health and well being in general so you can enjoy a physical life. See exercise as the homework you do so you can really enjoy sporting play.Here is a layout of a starting version of the workout and then an advanced version:Workout ACore exercises done with no weight first as a warming inLunge with no weight doing 6-8 reps per side in alternating fashion.Row with light weight for 8-10 repsPush ups easiest version for you for 6-8 repsShoulders just one of the 3 exercises with light weight for 6-8 repsSquats with no weight for 6-8 reps.Now core again all 3 exercises worked hard to failure the weights should be 10-20 lbsLunge with 10-20 lbs each hand, keep going until you get noticeable rubber legs and shakes.Row with 10-20 lbs until you feel the need to start yanking the weight to cheat it up.Push-ups choose a method which see’s you getting stuck at about 10-12 reps.Do all 3 shoulder exercises but keep it light and work each set until you feel the need to swing or bounce the weight to avoid getting stuck then stop.Choose a squat and use 15-25 lbs and keep going until you start leaning forward and cheating with your lower back to stand up, this means the legs are being unloaded and it is time to stop.*Keep at this routine until you can do a third run through then move on to a more advanced version.Workout BSide and front bends with 20-30 lbs 6 reps in each position.Lunge with 15lbs in each hand doing 5 reps per side.Row with 15-25 lbs for 8 repsPush ups any style as many as you can getShoulders the 3 side raise combination with 5-10lbs for 3 reps in each position.Sumo Squat with 20-30 lbs as many as you can doAb crunch middles only as much burn as you can stand into lying flat side twists with 20 lbs. try at least 8-10 repetitions per side.Lunges with only 10 lbs in each hand but work each leg doing bottom half twice then on the third rep comes all the way to the top and then switch sides. Keep going back and forth between legs (bottom half x 2 then a third full rep to standing) until you get stuck at the bottom and cannot get back up in proper form.Row with the same weight as first time but hold each repetition at the top with arms bent for a full 2 count. Go until you cannot perform the hold.Set yourself in the middle of a push up (a style,you can do at least 8-12 reps with) push to top then lower slow into the middle and hold yourself there until fatigue causes you to get pulled down. Don’t just hold until you want to stop, wait until you actually feel pulled down to the start position.Work seated overhead dumbbell press with 10-20lbs doing the alternating from the top version first. Perform 6-8 reps each side then go right into the press up fly down version with the same weight. Go until you cannot press up overhead in good form.Holding a 20-30 lb dumbbell in each hand do your squats by pausing for a full second in the middle on the way down. Go until you get stuck coming out of the bottom of the squat and cannot stand without cheating. Finish with a set of 10 vacuums holding each one in (and up) for a full 3 second count.~Final Performance TipsAlways breathe freely rather than holding it in otherwise you will fail early. It is not imperative but you can time your exhale with the tough part of each move where you come out of the bottom stretch position for your muscle contraction then breathe in as you return to start position. Focus on smooth form and note when you begin to shake and break form. Fight to keep movement going even as the body parts burn and weakness sets in but fight as well not to speed up and twist and cheat. If you have good form you can go right until you get stuck part way through a repetition at that point keep trying for a full 2 second count then carefully reverse and rest.It may sound funny but in this day and age of easy video recording you should make a vid record of your workouts. This way you can analyze your form and count your reps for progress measurement. You can see where you cheat and what you may want to work on. It is so easy to just set up your phone video it is almost a mistake not to.Try the routine three times a week for three weeks while cutting out junk food and you will be happily surprised by the results. Make sure to get plenty of water, rest and vegetables to get the most out of the recovery and rebuilding part of the process.
Let us know how it works…out
Andrew and Tierney
-WeFit

Great post
Sent from my iPhone
>
Thank you kindly❣️
Thank you!
Thank you kindly!